Detail from "Rain Dance," an original quilt by Sherrie Spangler

Monday, May 31, 2010

Deer in our rhodies and road


JULIA TOOK THESE PHOTOS of two male deer in our backyard a few days ago -- they had probably just finished grazing in Farmer Dave's vegetable garden. You can see from the top photo how green it is here in the Northwest due to the UNRELENTING RAIN. After posing for a few more pictures, the deer picked their way through the rhodies and then ambled down the gravel road to the beach.


COLORFULLY YOURS

Friday, May 28, 2010

You deserve it!

It's been raining ALL week, and Dave is off canoeing in Canada, so I decided to mail order that deliciously scented Deserving Thyme shampoo and lotion that I discovered years ago at a hotel and have been thinking about ever since ... free FedEx shipping AND free gift wrap. Then Julia and I decided to dedicate an entire post to "YOU DESERVE IT!" We encourage all of you to gift yourselves with whatever you deserve!


Dorky picture of me taken by Julia with products I ordered for myself.
The cheery free gift wrap just made my day!

The night before, worn down by all the rain and not being able to do anything outside, I baked a batch of chocolate chip cookies and Julia made vegan peanut butter chocolate brownies.

WE DESERVE IT!


Why, cookies FOR ME?
You deserve it, Julia said, as she took another goofy photo.

Even the rabbit got into the action.
You deserve that banana, Bunners!


Then, because it was STILL raining today, my neighbor and I went to her favorite nursery and loaded my van with flowers for our pots. We deserve it! Now we just have to wait for a letup in the rain and cold so we can get outside and plant everything.


Have a colorful day

YOU DESERVE IT!

Tuesday, May 25, 2010

Fabric discharge with the new Nuts!

The Twisted Nuts sewing group, with the results of our fabric discharge experiments from last weekend. From left are Linda P. (who organized the event at her house), Linda J., Nancy, and me. Doesn't "Nancy and the Two Linda's" sound like a girl group from the '60s? Carolynn is the fifth member, but she wasn't there because she was recuperating from training so she can bicycle from Seattle to Portland. Is she nuts, or what?

WHAT THE HECK
IS FABRIC DISCHARGE?


and
WHY ARE WE CALLED
THE TWISTED NUTS?

Glad you asked! Discharging -- for fabric artists, at least -- means removing color from fabric. Black fabric (cotton, rayon or linen) is often used because when you remove the color, with bleach or another discharge product, you can end up with anything from gray to tan to orange to green. You can keep part of the fabric black by covering that area with a "resist," which keeps the bleach from getting to that part of the fabric. For our resists, we experimented with pressed leaves, masking tape, buttons, and freezer paper.

Above, I used masking tape for my resist to create a design that reminds me of African mud cloth. This is how it looked before I sprayed it with bleach.
Linda P. used freezer paper cutouts (above) that she ironed onto her fabric and then topped with flattened ferns for her resists. Below, she sprays a mixture of half bleach and half water onto it. (We did this outside because you really shouldn't breathe in those bleach fumes. I held my breath while I sprayed and then backed away. If I were to do more of this, I would invest in a respirator.)
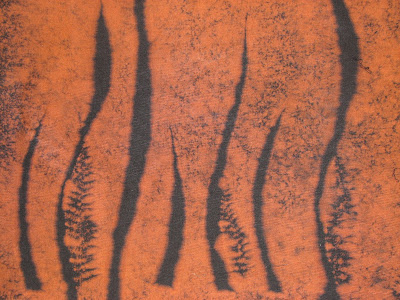
Here is Linda's end result. After she sprayed the bleach, she waited a few minutes while the fabric discharged, revealing a rich pumpkin color. Next, she plunged it into a bin of water, then into a bin with a product called Anti-Chlor (which stops the bleach action), then into hot soapy water. This was all set up on her back patio.

While our fabric soaked in the soapy water, Linda served us lunch of tuna salad sandwiches and tomato basil soup. Delicious. Then she tossed everything in the dryer and we were done! We spread our pieces out on her living room floor, took some pictures, and then pulled out our other sewing projects and some art quilt books and magazines and whiled away the rest of the afternoon at Linda's dining room table.

Two excellent books that detail the discharge process are "Create Your Own Hand-Printed Cloth," by Rayna Gillman, and "Complex Cloth," by Jane Dunnewold.
There are a lot of other variables to explore, including using bleach pens, Soft Scrub, dishwasher gels that contain bleach, and discharge paste. If I do any more work with bleach, I repeat, I will invest in a respirator.

This piece (above) was created by placing old buttons on the fabric as resists. Below, the dried pieces are spread on the floor. Mine discharged to the lightest, probably because I really saturated mine with bleach. Three of us (including me) used black Kona cotton.


BUT WHY ARE YOU THE TWISTED NUTS?

We settled on our name because Linda J. brought a leaf that Nancy identified as a "contorted filbert," which led to "contorted nut" and finally the "twisted nuts."

MAY THE COLOR NOT BE DISCHARGED
FROM YOUR DAY!

What kind of rose is this, anyone?


Six days ago I received this gorgeous yellow rose when I was installed as secretary of the Gig Harbor New Neighbors. My gardening neighbor Rosemary spotted it on my kitchen counter and said it's a special type because of the fine line of pink around the petal edges. She couldn't find her rose book to identify it, so if anyone knows its name I'd love to hear from you. I'd say it's special because it has survived being under my care almost a week.

Posted by Picasa

Wednesday, May 19, 2010

I'm on Laura's blog!


I'm so excited! One of my art quilt IDOLS, Laura Wasilowski, has posted a photo of my work on her blog (the crazy quilt block above using Laura's hand-dyed thread). You can see her website, blog, and the gorgeous hand-dyed fabric and thread that she makes at www.artfabrik.com

Have a colorful day!

Sunday, May 16, 2010

More sea critters!

Here are some pictures I took Saturday at Kopachuck State Park at low tide. We were there for the last day of training to be volunteers for Harbor WildWatch (www.harborwildwatch.org), a group whose mission is "to inspire stewardship of the Puget Sound through education."

It was a minus 2.8 low tide, which means the water was really far out.
Those are the snow-capped Olympic Mountains on the horizon.


The pictures above and below show the unbelievable variety of living things attached to the bottom of this rock, which is only about the size of our heads. It's like a whole universe under one rock. Joyce discovered it as she was gently tilting back rocks to see what we could find. After we looked, we carefully put it back in place so the little critters would remain sheltered from the air and sun while the tide was out.

There are two baby sea stars (which you may know as starfish, but they're not fish), snails, tiny mussels, barnacles, seaweed, and a variety of soft globs that we haven't identified yet. Several small crabs scuttled away when we lifted the rock.

Joyce points to an unidentified white soft thing attached to the rock.
If you know what it is, let me know.


Wild life specimen Dave, left, helps set up the awning and tables where naturalists will fill touch tanks with marine specimens (which will be returned to the same intertidal zone where they were found).

The mighty SUNFLOWER STAR is a predatory creature that can move pretty fast when chasing down a meal (clams, crabs, urchins, etc.). The largest and fastest sea star in the Puget Sound, sunflower stars can grow up to 3 feet in diameter. This one was about 16 inches wide. They're born with five arms but eventually grow 15 to 24.

Ooey gooey! That big beige coil in the touch tank is a MOON SNAIL, and the rubbery dark gray thing is its egg case, or "sand collar." The moon snail has an enormous feeding foot that protrudes from its shell and surrounds its prey. It uses its raspy tongue to drill a hole in thicker shells to get to the animal inside. When you find an empty shell on the beach with a perfectly round hole near the ligament, it means it fell victim to a moon snail.

The snail makes its SAND COLLAR by mixing sand with mucous and depositing about 100,000 eggs between two layers of the sandy mixture. This is formed around its body, then the snail releases the egg case and the eggs hatch in about six weeks.

Click on this photo to really get up close and personal with a moon snail.

It's a beach bunny! No, it's just Bunners in the garden, cuter than a moon snail.

Live sand dollars. Only the dead ones are white.

Kopachuck Beach's sandy areas are filled with SAND DOLLARS like the two above. They can grow to about 5 inches in diameter; these are about 3 inches. Tiny spines on top give them a velvety appearance, and tube feet underneath let them walk and burrow. White sand dollars are actually the exoskeletons ("tests") left when the animal dies. Sand dollars can live for up to 13 years (so please don't step on them).

Definitely CLICK ON THIS PHOTO for a larger view of tube worms.

I'll write more about the worms later; now I'm going for a walk.

In the meantime, please let me know if you've found any errors in this post -- I'm just starting to learn about marine biology.

My April 20 post,
SEA STARS, BARNACLES, SLUGS, OH MY!
has more photos and info. Check it out!

Friday, May 14, 2010

More silk painting adventures

Clouds of silk


I call these my silk clouds. I painted pieces of white silk organza and chiffon on the deck this week, then took pictures when the sun was low so that the sheer crumpled fabric would cast interesting shadows. I also painted more silk ribbon. I used Dyn-a-Flow fabric paint (which is very thin and spreads out well on silk), SetaColor transparent fabric paint (thicker, but I water it down) and Colorhue fabric dye. (See previous entry about Colorhue.)

It's a party! This is the fruit of two sessions of silk painting.
This could be very addictive.


It's really easy to create coordinating fabric and silk embroidery ribbon
when you paint them at the same time.
I used Colorhues for these.

Arranged for drying:

This shows how I arranged the fabric to dry in the sun. Putting it in pie tins creates a lot of creases and folds toward which the paint pigments migrate, giving you light and dark areas from the same paint application. I spread the orange-yellow silk organza on a plastic bag that I taped around an old mat board scrap. I learned the pie-plate paint method from one of my all-time favorite books, "Colors Changing Hue," by Yvonne Porcella (1994).

This group reminds me of the fruity syrup poured on shaved ice.

This photo shows how one piece of fabric can look different depending on how it's handled. On the left I pressed a few rows of pleats; the center is ironed flat; the right side was allowed to dry while crumpled.


Here's another coordinated group of silk yardage and ribbons,
arranged to dry on a plastic garbage bag.


And here is the same fabric, ironed flat.
This is the same fabric used in the blue "cloud" picture.


And what will I do with all of this?

If you have to ask, you're not a quilter. Quilters know that it will all go into the "stash" to await placement in a future art quilt or a framed fabric collage, or maybe a garment. Or maybe it will just sit in a beautiful bowl in the middle of the coffee table. I'll keep you posted!


Have a colorful day!

Posted by Picasa

Wednesday, May 12, 2010

Silk ribbon painting experiment

The first group of silk ribbons that I painted with Colorhue dyes.

I've been painting fabric to use in my art quilts for about 15 years, but now that I'm incorporating silk ribbon embroidery into my work I decided it's high time to paint my own ribbon. It's SO much cheaper, but mainly I'm interested in using my own palette.

I started by ordering a variety of widths of silk ribbon from Dharma Trading. I cut some lengths of about 18" to 36", then wet the ribbons so the fibers would open up and receive more color. At first I planned to stretch the ribbons on a frame so I could paint them individually, then I decided that was too much work. ... This is supposed to be FUN.

So I plopped them into my ancient disposable pie tins (which I've been reusing for years for paint) and just worked the color into them with cheapie foam brushes.

The photo below shows the results of using undiluted Colorhue, which is a fiber reactive instant set silk dye. (I bought a set of these at least six years ago at a quilt festival and promptly forgot about them until now.) I poured a tiny amount of color into a container, dipped my brush in it, and sponged it onto the pile of ribbons (Hmmm, this might be even quicker if I just use a big sponge. Have to try that next.) I did this on the back deck, and it was dry in less than an hour, ready to be ironed and put into some art.

I used undiluted Colorhue dyes and LOVE the saturation.

I also used my old standby: Setacolor transparent fabric paints. (Available at Dharma, Michael's and lots of other places.) These take longer to dry, so the paint pigments have time to migrate to the creases and soft folds where the ribbons are crumpled in the pie tin. This creates some really interesting patterns, which you can sort of see below. I'll take better photos of this technique later.

My first batch of ribbons painted with Setacolor transparent fabric paint.

I think I'll overpaint some of these to give them more depth ... maybe work buttercup yellow-orange into the pink ribbon, for example. And I'll dilute the Colorhue for some lighter colors. Lots of things to explore, so I'll keep you posted.

I'd love comments and suggestions!

Saturday, May 8, 2010

It's all about the water in Gig Harbor

Mt. Rainier as seen from a little park at the mouth of Gig Harbor

When you live in Gig Harbor, WA, water is a part of daily life. (Even when it's not raining.) A few days ago, Dave and I wandered downtown to watch the Thursday night sailboat races, then had dinner at The Tides Tavern, where you can hitch up your boat out back. After stuffing ourselves on beer-battered halibut, clam chowder, ribs and fries, we waddled down the street to a little viewing platform at the mouth of the harbor and took the photo above of Mt. Rainier.

Here are some pictures from the races. They're being held every Thursday in May, starting around 6:30 near Arabella's Landing. The turning points are Anthony's and the mouth of the harbor. They're sponsored by the Gig Harbor Yacht Club, but you don't have to be a member to take part. (I'm not a member. We only have kayaks.) For more info, go to www.gigharboryc.com

Peaceful reflections while waiting for the starting gun.

And they're off!


It was a gorgeous May evening. Since we're so far north, it stays light now until nearly 9.

Two days later we were back downtown for a day of volunteer training for Harbor WildWatch. On our lunch break, Dave and I went to a little restaurant called Harbor Kitchen and sat on the deck out back. It was quiet and peaceful -- only one other couple, the water, a group of kayakers and a Great Blue Heron preening on the dock. I shot these photos from our table:

Kayakers training in Gig Harbor (the view from our cafe table).

A Great Blue Heron preened on the dock behind Harbor Kitchen as we ate our lunch.

No, these puffin feet aren't in Gig Harbor. But they are across the bridge in Tacoma -- at the Tacoma Zoo last week.

And the most interesting water/boat event of the past week was the evening sail we took aboard the historic schooner Adventuress, which was built in 1913. The sail was sponsored by People for Puget Sound (pugetsound.org), an organization devoted to the health of our sound. We sailed around Commencement Bay in Tacoma. It was a chilly, gray, drizzly evening, but the boat was beautiful and the passengers and crew were fun to talk with. It was nice and cozy down below in the living quarters.

The historic schooner we sailed on last weekend with People for Puget Sound.

That's a guy way up there on the Adventuress, working on the rigging.

Here's the action on deck of the Adventuress in Commencement Bay, Tacoma.


AHOY!